![]()
A user's review
The Acer Scanwit review was written using NETSCAPE COMPOSER and is best viewed at 800 x 600 in 24 bit colour.
![]()
A user's review
The Acer Scanwit review was written using NETSCAPE COMPOSER and is best viewed at 800 x 600 in 24 bit colour.
Please check out the Update Page for the latest information about the ScanWit and scanner market.Introduction Features Market Overview The Review Sample scans Installation The Hardware The Software The Documentation Using the scanner Performance Conclusion Useful links Specifications
Introduction
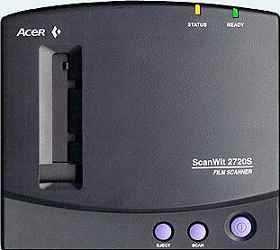
Acers "Scanwit" 2720s film scanner seems to be one of the worlds
best-kept secrets!
There are no on-line reviews of it, no advertisements for it, and
stockists are few and far between; it almost seems as if Acer are embarrassed
to tell anyone about it.
I can't see any reason for this low profile approach. The ScanWit
is a very capable performer, and as far as I've been able to determine
in practice, all of Acer's claims for this scanner are met or exceeded,
and they have nothing to be ashamed of.
A scanner of this specification at such a low price deserves to
be much better known, and that's the main reason I decided to do this user
review. Another reason being; anything that gives the other manufacturers
a bit of stiff competition, and perhaps helps to drive their prices down,
must be to the consumer's benefit in the long run.
My last reason is not quite so altruistic: Having invested my money
in one of these scanners, I would hate for support for it to be withdrawn
because there wasn't a sufficiently large user-base.
That said, I've attempted to be as objective as possible in both
my praise and criticism of this little-known piece of hardware.
Market
Overview
If film scanners were sold by size then Acers
Scanwit would surely be one of the most expensive on the market, being
about the size of a 4-slice toaster, but since it's actually positioned
at the bottom end of the price range its specifications
are even more impressive than its sheer volume.
By being a latecomer to the film scanner market
Acer seems to have taken advantage of the latest advances in technology
to improve performance while at the same time cutting costs.
At a street price of just under 300 UK pounds
(about $450 in the US) the Acer 2720s is presently the cheapest film scanner
worth considering for serious 35mm slide and negative scanning.
Don't be fooled by the low cost, or the rather
naff name, it's a very capable machine, and with the current bundling of
Adobe Photoshop5 LE software and a PCI bus SCSI interface card it's
a downright bargain. You'd have to spend over half as much again
on the Canon CanoScan 2710 or Minolta's Scan Speed to get more-or-less
the same technical specification.
Its closest rival in terms of price is the
Minolta Dimage Scan-Dual, which has both lower resolution and bit depth
than the Scanwit, although the Minolta does take APS size film, whereas
the Acer doesn't. The Scan Dual is quite an old design now, and is showing
its age. Suffice it to say that the Minolta's performance at an in-store
demonstration didn't impress me, either with its scanning speed, or the
quality of results when scanning negatives.
The next rung up the price ladder brings us
to Hewlett-Packard's Photosmart S20 scanner, which with a resolution of
2400dpi again falls slightly short of the Acer. The HP S20 has had some
very good reviews for image quality, but has an inherently slower USB interface,
and a carrierless film-feed system which has raised some criticism.
A couple of other scanners have come on the
market lately, at an even lower price than the Scanwit, but it remains
to be seen whether they deserve serious consideration.
Availability of the Scanwit in the UK seems
to be mainly through the Jessops chain of photographic retailers, where
it's available off the shelf in most branches.
Addenda: The import
and distribution of Acer scanners in the UK is through Introphoto Ltd.
Also, Minolta have replaced their Scan Dual with the
Dimage Scan Dual II.
This has a resolution of 2820dpi and 36 bit colour depth,
but the price is naturally quite a bit higher than the original Scan Dual.
OK. That's the advertising type blurb over with, now let's get down to the real review.
Who am I to be reviewing a scanner anyway?
For all you know I might not know a film scanner
from a hole in the ground.
Well.... I've had a passion for photography
practically ever since I can remember. I've trained and hold qualifications
in both Photography and Electronics, and I've worked professionally in
both fields. For over 25 years I've produced conventional photographic
colour and black and white prints, and for the last five years I've been
scanning those prints and using Photoshop to edit them. Scanning directly
from film seemed the next natural progression.
One of the few innate talents that I was born
with was a naturally good eye for colour and I have a distaste for bad
colour reproduction; I have to look away every time I pass one of those
minilabs spewing out their appalling prints.
So; I think I can just about tell a scanner
from a hole in the ground, and a good scan from a bad one.
Sample
scans from the Scanwit
For those of you with a short attention span
that can't be bothered to read the words: I'll cut to the chase and show
you some sample scans . After
all, the scan quality is what's ultimately important; but
I would urge you to read the rest of this section, just so you know exactly
what you're looking at.
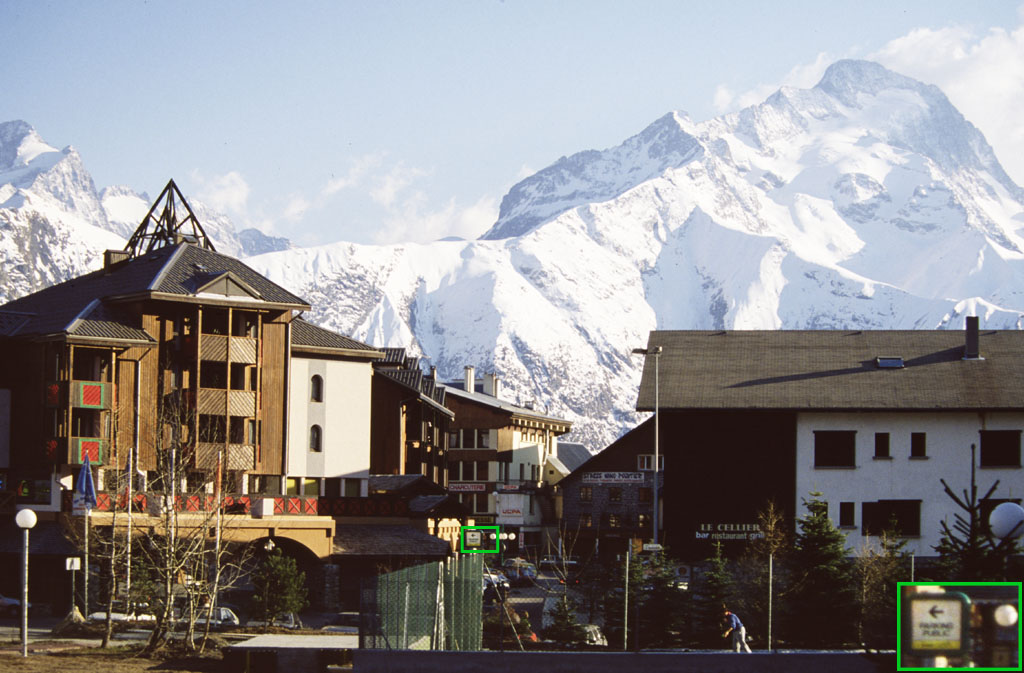
There are scans here from both slides and negatives, and apart from
some adjustment to the gamma or tone curve in the scanner's own acquisition
software, they are "as is" straight from the scanner.
No sharpening or colour enhancement has been applied to any of these sample images.
Technical stuff
All of the 35mm originals were scanned full frame at 2700 dpi, the
maximum resolution of the scanner, with 36 bit colour depth, giving 54
Mb files of 3720 by 2550 pixels! These were then converted to 24 bits in
Photoshop and reduced in size to approximately 1024 pixels by 700.
While they were at maximum resolution a small section was cut out
of each image, and then pasted into the final image as a highlighted inset
at the bottom right-hand corner. This allows you to see the original detail
and judge the sharpness of the scanner for yourself.
Finally, the images were saved as high quality progressive JPEGS.
All of the following images have been tested on several systems,
with monitors of varying size, age, and quality, and have a satisfactory
appearance on most of them. If they don't look OK on your system, your
monitor may be in need of calibration or adjustment.
The pictures were chosen to show a good range of colour and a wide
tonal range rather than any pictorial merit. The slides especially were
selected to show how much shadow detail is obtainable and the lack of noise
in the shadow areas.
Warning! These
files are quite large, and can take a long time to download.
Slide No.1 (157K, Fujichrome) Slide
No.2 (198K, Ektachrome) Slide
No.3 (184K, Kodachrome)
Negative No.1 (160K, Ektar 100-2) Negative
No.2 (163K, Konica SRG100) Negative No.3
(178K, Gold 100)
There are a few more pictures available for you to look at on my Gallery page: Please Click here
Now on to the wordy bit, where I give you my (hopefully) un-biased opinion of Acer's scanner and its Software.
I've made no concessions to the Acer's low
price in my criticism of it, and I haven't pulled any punches; if something
is wrong, it's wrong, no matter how much or how little you've paid for
it.
Please remember that it takes a lot of words
to describe even a small shortcoming, and the amount of space devoted to
a problem may not be proportional to its importance in the overall functioning
of the equipment.
Installation
The thing that first impressed me when I unpacked
the Scanwit was the completeness of the kit. 
There really is everything needed to get started
in the box.
The only additional items you need are a PC
and a few slides or negatives!
Hardware installation is about as easy as
it gets; open up the PC, pop the SCSI card into a spare PCI slot, screw
it down and put the cover back on the computer. In fact, if you already
have a SCSI card with an external connector, you won't even have to do
that. I've tested the Scanwit with Adaptec 1510 and 2940 cards, and an
Advansys 2930 as well as Acer's own "Acard" interface, and the scanner
worked perfectly with all of them.
Installing the software was also quick and
painless; the driver CD installs both the SCSI driver and the "MiraPhoto"
Twain driver in one go. This only leaves the installation of Adobe Photoshop5
LE and/or Ulead PhotoExpress to complete the operation. You could
easily have the scanner working within 30 minutes of opening the very big
box that it comes in.
Incidentally, because the scanner itself is
a fairly bulky item and the film carriers are as long again, the Scanwit
needs quite a large "footprint" to operate in. It fits quite nicely on
the top of my midi-tower PC case, though.
The Hardware
My initial impression of the overall build
quality of the Scanwit was good.
The scanner itself is well made, and has a
weighty and robust feel to it. It has a plated steel chassis with a nicely
finished plastic casing, and there's a dust exclusion flap on the entry
for the film carriers, but the carriers themselves are a bit of a let-down.
There are two carriers supplied, one for negatives
and unmounted film strips, and one for mounted slides. They a re
of all-plastic construction, and in my view fall below the high standard
of the scanner itself in both finish and design.
re
of all-plastic construction, and in my view fall below the high standard
of the scanner itself in both finish and design.
The slide carrier, which holds up to 4 slides,
hinges open to reveal flimsy looking plastic springs which hold the slides
in place. However, looks can be deceptive, and inserting a slide needs
some pressure to push the plastic retaining springs aside before the slide
finally clicks into place. There is a bit of a knack to it, and the plastic
springs do get a bit easier after a little use.
At the time of writing this, my slide carrier
has survived several months of use, but I'm still slightly worried about
longer term reliability.
The negative carrier takes strips of up to
six negatives, and thankfully it's a lot easier to load and hasn't got
any plastic springs to give concern. Film flatness is adequate, and negatives
can be inserted and removed easily without any danger of scratching or
fingerprints.
The film carriers go into a vertical slot in
the front of the scanner, and must be pushed in straight and fairly quickly
in order to get the auto-feed mechanism to accept them. Mis-feeding the
carrier simply results in the scanner refusing to pull it into the slot
until it has been fully withdrawn and re-inserted. Again, there's a bit
of a knack to it, but no harm seems to come from a mis-feed, apart from
having to wait a few seconds while the mechanism resets itself before trying
again.
On the plus side, the carriers have never
jammed on me; they either go in, or they don't.
The front of the case has three push-button type switches in addition to the slot for the film carrier. The slightly larger power on/off switch is on the right, while the leftmost button ejects the carrier. The middle button commands the computer to open the scanning software, but only works with the supplied Photoshop5 LE. That's a bit annoying, as I have the full version of Photoshop5, and haven't yet found any way of re-directing the button's software applet to open that instead.
The back panel of the scanner has three sockets
and a switch on it. The switch is for setting the SCSI ID of the scanner
and ranges from 0 to 7. There's an IEC type inlet for the power lead, a
female 25 pin "D" type socket for the SCSI lead from the computer, and
another 25 pin socket for daisy-chaining other SCSI devices to.
Acer's instruction booklet mentions that a
SCSI terminator should be fitted if the scanner is the only external SCSI
device. I'd been using my scanner successfully for a couple of weeks before
spotting the reference to a terminator, and dutifully obtained and fitted
one. It may, or may not, make any difference to the consistency and reliability
of the scans, but since it only costs a few pounds, I'd recommend fitting
one.
NB. The terminator should be a passive type, since the scanner SCSI socket
doesn't provide the power necessary for an active terminator.
That's about it as far as the hardware goes. Nothing has jammed or broken in the few months that I've had the machine, and my only complaint is the design of the slide carrier. Whether my fears about it are justified or not, only time will tell.
Update: After nearly 10 months of use, one of the spring clips did
finally break on my slide carrier.
It's still fully useable in fact, but Acer really ought to rethink the design.
The Software
Good software can make or break the reputation
of even the best piece of hardware, and this is especially true
with scanners. For instance, many people buy
a Nikon scanner for its multi-pass noise reduction, which is a purely software
implemented feature, and of course the Digital ICE facility.
MiraPhoto:
Acer's "MiraPhoto" acquisition software and
Twain driver 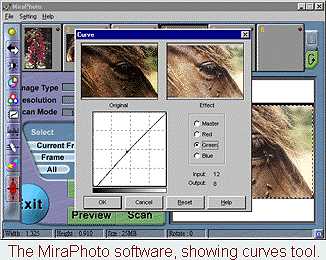 doesn't
boast either Digital ICE or multi-pass, but nonetheless it packs in a reasonable
set of tools for dealing with a wide variety of slides and negatives.
doesn't
boast either Digital ICE or multi-pass, but nonetheless it packs in a reasonable
set of tools for dealing with a wide variety of slides and negatives.
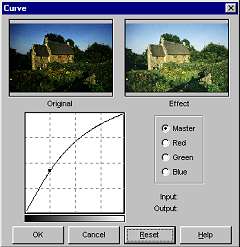
Most important of all, it has "curves", probably
the single most powerful tool for image correction, and as I'll explain
later, it's use is essential in order to get the best out of the scanner.
MiraPhoto has all the normal adjustments you'd
expect too; colour correction, brightness and contrast, plus a levels (histogram)
control, together with a modest selection of filters for sharpening or
blurring the image.
The filters work very well and there seems
to be no speed penalty incurred for applying any of these effects during
scanning, or if there is, it's small enough to be un-noticeable.
MiraPhoto's tools seem every bit as competent
as those available in Photoshop, and you needn't have any qualms about
using them, especially as it speeds up the whole process of getting a decent
final image.
Three output modes are available from the
scanner via MiraPhoto; 36 bit, which gives you all the colour detail that
the scanner is capable of, standard 24 bit, and "High Speed", also a 24
bit mode, but at slightly lower quality. MiraPhoto also supports "batch
scanning", which simply means that all selected frames (up to four slides
or six negatives) are automatically and consecutively scanned with a single
click on the scan button.
Other features of MiraPhoto that need a mention
are the ability to do a RAW scan, to scan monochrome negatives, and a comprehensive
set of pre-defined profiles for most current colour negative films.
As you can see from the illustration, Miraphoto
has a childishly colourful user interface. Unfortunately it isn't childishly
simple to use; 'cos instinctive it ain't.
When first installed, Miraphoto's default
settings would like you to scan a postage stamp size area from the middle
of every frame at 300dpi in high speed mode: Great for a salesman's quick
demo on a computer with a small amount of memory, but frustrating if you've
actually bought the machine and want to get on with using it to produce
high quality scans.
Being able to individually set all of the
scan parameters for each and every frame is a big plus point in its favour,
but having to set up sensible scanning options at the very outset,
and
find your way around the software
is a big minus, and could be a daunting task
for the newcomer. Admittedly the facility to save configurations is very
easy to use, and you only have to go through the setting-up procedure once,
but it's not a good introduction to the scanner.
Miraphoto also seems to have some adaptive (i.e. learning) capacity, since it spends a lot of time re-adjusting the focus when first used, but thereafter only adjusts the focus when the carrier has been removed and re-inserted, or at the first scan after power-on. Again, it's a slightly disconcerting introduction to using the scanner, testing your patience when you're most eager to try out your new toy.
I'll cover the use of MiraPhoto in more depth elsewhere, but I must mention in passing that Third party software is available for the ScanWit that gives additional functionality to it, including multi-pass scanning.
Now for the rest of the bundled software.
PhotoShop 5 LE:
Having already used the full version of Adobe
Photoshop5, I was prepared to be disappointed by the LE
(Limited Edition) version, but instead I was
pleasantly surprised.
There are areas where some of the tools and
permutations available in the full version aren't available in LE, but
on the whole it's a very usable and capable package. It may even be an
advantage not to be overwhelmed with choice, as the learning curve for
the full version of Photoshop can be very steep.
Photoshop 5 is one of the few image editors
available that can handle 48 bit image files, and thereby take
advantage of the full 36 bit colour depth
available from the ScanWit. This ability is retained in the LE version,
albeit with some minor reduction of options: You can still adjust curves
and levels at 48 bit colour depth, but tools like saturation and inversion
have been removed. Changing to 24 bit mode gives you back these facilities
and many more; too many to list here.
Suffice it to say that Photoshop 5 LE will
do everything that the average home user, and many professionals, will
need to produce first class images.
One minor gripe is that Photoshop 5 increases
the scan acquisition time noticeably over simpler packages such as Jasc
PaintShop Pro 6, and this applies to the full version as well as LE.
Ulead PhotoExpress:
To sum up the included software: MiraPhoto
is fairly basic, but still manages to be a little awkward to use, though
its shortcomings are more than made up for by the inclusion of the excellent
Photoshop 5 LE, and Ulead PhotoExpress adds all the whistles and bells
you might never need.
Third party software:
I'd also recommend getting a copy of Jasc
PaintShop Pro, especially if speed is of the essence to you. This package
opens far quicker than Photoshop, and also completes the scan acquisition
in a shorter time. I used PaintShop Pro to compile the speed timings for
this very reason. Unfortunately, although it imports 36 bit data and 48
bit files, these are automatically converted to 24 bit mode. This means
the full potential of the scanner can't be realised using PaintShop Pro,
but if 24 bits are enough for your application, the time saving can be
dramatic.
The Documentation
Well, what about the on-screen help? Since
it gets its own little shortcut in the program menu, you'd think that it
might be much more comprehensive: You'd think wrong. Most of the on-screen
help simply duplicates the information in the manual, and even confuses
the issue by illustrating some of the dialogue boxes differently from the
way they appear in the actual software.
So, marks out of 10 to Acer for the documentation,
about 3.
I've made an attempt to rectify this situation with a brief Tutorial
on the use of MiraPhoto and getting more out of the ScanWit.
The ScanWit in actual use:
Lastly we come to the other image editing
package that's included with the ScanWit, Ulead's PhotoExpress.
This is a full-on, in-your-face, party-animal
of a package that's squarely aimed at the "fun" end of the market. It offers
more frivolous effects than you can shake a mouse at. Morphing, frames,
weird filters, they're all there in one handy (disposable) package.
Don't get me wrong, I'm not saying that PhotoExpress
isn't worth using, it's just that this really isn't my bag, and I find
it difficult to enthuse about it.
I did spend an evening with it, in the interest
of research, and quite honestly, the sheer choice of menu after menu of
effects, cards, calendars, filters, sample images, clip-art, and what-have-you
was totally overwhelming, but if that sounds the sort of thing that gets
you going, then it'll probably keep you glued to your monitor for a month.
If not......well, it'll probably keep the
kids amused for a couple of hours at least.
Part image editor, part desktop publisher,
part printer wizard, PhotoExpress tries to be something of everything,
but in my view it just tries too hard, and ends up giving you quantity,
rather than quality.
It does have one saving grace, and that's the
ability to print multi-sheet posters wihout any hassle.
This makes A3 or larger prints possible with just an A4 printer.
You could go mad, and paper the bedroom with that stunning shot of a 2-4-0
saddle tanker having its fire dropped. Or then again, perhaps not.
Be warned though, Photo Express needs 80 Megabytes
of disk space.
Yep, you read that correctly, Eighty Megabytes, is
what this overgrown fun-loving mammoth, or perhaps, white elephant of a
package takes up.
Just a word about Ed Hamrick's Vuescan software;
it's a non-twain compliant acquisition driver that supports the ScanWit
and several other SCSI filmscanners. The user interface is extremely bland
compared to MiraPhoto, and consists mainly of text-only pull-down menus,
making it simpler to use in my opinion. Results from Vuescan can be extremely
good without much user intervention, and could be the answer for those
who want quality results, but don't want to be bothered tinkering with
the image or getting too deep into colour management issues. It also adds
multi-pass scanning to the ScanWit's abilities, if you can put up with
extended scan times.
To find out more visit Ed's
Website
"Great!" I thought as I unpacked the
scanner, and a nice thick, glossy user manual fell out of the box, "that'll
do for a little light bedtime reading....." and then I opened the pages.
The gloss ends at the cover, and you find you're sharing the manual with
four foreign languages.
Only 60 fairly dismal black and white pages
are in English, and 19 of them are devoted to showing you around Ulead's
PhotoExpress. Of the rest, discounting the legal disclaimers and the contents
page, the first 12 contain very basic information, such as line drawings
of the kind that show you where to plug the power lead. The remaining 24
pages describe the various functions of MiraPhoto, but not in any great
depth.
Nowhere is there any attempt at showing you
how to actually use the scanner, or any advice on improving your
scans.
The only positive comment I can make about
the user's manual is that it is liberally illustrated, but the information
content seems to have been squeezed out to make room for the pictures.
I get the impression that both the paper and
on-line documentation were put together in rather a hurry, because
all in all, the documentation is a bit of
a disaster. It might be of some help to those new to computers, and entirely
new to scanning, but very quickly leaves you high and dry in getting better
results out of the Scanwit.
Acer really will have to try a lot harder
with their documentation if they want to win friends for this otherwise
excellent scanner. A section on how to get the best out of your scanner
really would make all the difference.
Straight from the box, Acer's scanner isn't
going to give you the best results, especially if you mainly use slide
film, but I'll let you into the secret of getting top-quality scans
from the Acer Scanwit in six words, -
"YOU MUST USE THE CURVES TOOL"
Acer should include this message plainly and
often in their documentation, but they don't.
For reasons known only to Acers design team,
the ScanWit's default settings seem to be biased towards getting good results
from negatives, and results from slides are generally far too dark
without any user intervention.
(But see footnote *)
The remedy is very simple; just use the curves
tool in MiraPhoto to change the gamma curve for slides from the normal
straight line to an archlike curve (see illustration), and once you've
found a suitable setting that works for the majority of slides, save that
configuration as default.
Having got that out of the way; scanning with the Acer is no more complicated than using a flatbed, and your scans will be limited mainly by the quality of the original slide or negative. If any more refined correction or enhancement is needed, that can easily be done in Photoshop5 LE.
The low price of this scanner had to reveal itself somewhere, and that's mainly in the lack of refinement of "MiraPhoto" and the poor documentation. However, in my opinion, the little bit of work required to set this scanner up properly is more than compensated for by its extremely competitive price.
*Having
nearly completed this review I've learned that many other users of different
brands of scanner complain of their slide scans being too dark as well.
As one complainant with experience of many models of scanner put it "Dark
scans seem to be the rule, rather than the exception." Although not much
comfort, it does put the Scanwit on a more even footing with its more expensive
rivals.
Performance
Now I'll get down to the technical nitty-gritty
of how well the Acers performance measures up; both to Acer's own specifications,
and against its much more expensive competition.
Scan Speed:
As you can see from the table,
Acer's speed claims were easily met, and even exceeded, but one strange
fact that has shown up is that "High speed" mode is not always the fastest;
at maximum resolution the High-quality 24bit mode beats it!
A comparison with other manufacturers claimed
times shows the ScanWit to be one of the fastest film scanners you can
buy at any price.
Speed rating: ![]()
![]()
![]()
![]()
![]()
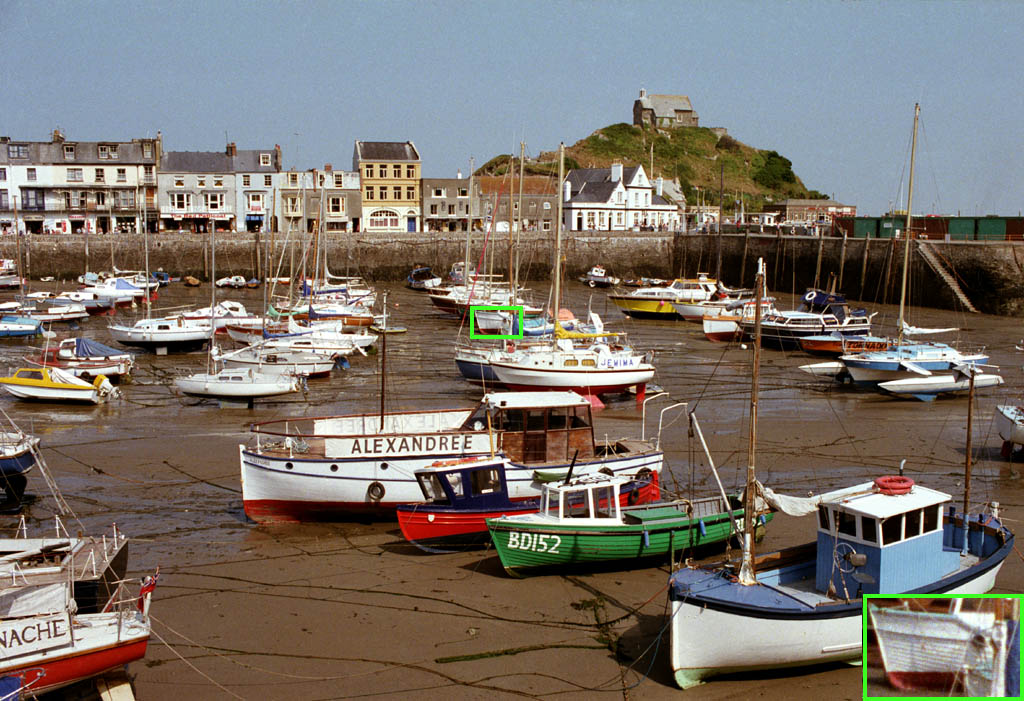
Sharpness:
The sharpness of this scanner is very good
by any standard.
With faster films the grain is easily resolved
by the scanner. There is no sign of colour fringing introduced by the optical
system, and in fact it's hard to detect any faults in the imaging at all.
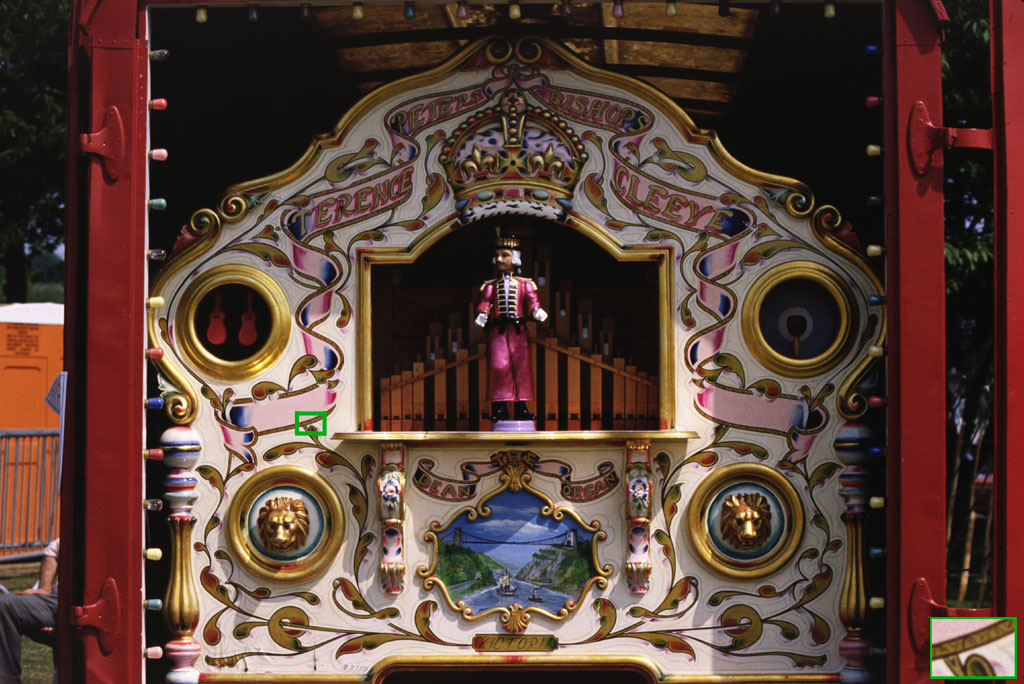
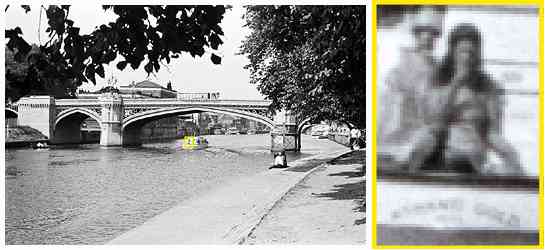 By
way of illustration, this is a colour scan from an extremely sharp
black&white negative. The outlined area is less than half-a-millimetre
wide on the negative and the enlargement represents about a 120 times magnification
when displayed on a 14" monitor.
By
way of illustration, this is a colour scan from an extremely sharp
black&white negative. The outlined area is less than half-a-millimetre
wide on the negative and the enlargement represents about a 120 times magnification
when displayed on a 14" monitor.
In other words, at this scale the entire 35mm frame would cover
a 10ft by 15ft wall!
The name of the boat "ASHANTI GOLD" can just
be read from the negative with the aid of a microscope.
In the scanned image it's the digitisation, and not the scanners
optical sharpness, that reduces legibility.
This level of optical quality puts the ScanWit firmly in the top
league.
The autofocus system is not infallible, though,
and won't easily focus on a very dark or low-contrast piece of film, and
I've had one or two out-of-focus scans in these rare circumstances.
Sharpness rating: ![]()
![]()
![]()
![]()
![]()
Noise:
Noise, in this case, doesn't mean how loud
the scanner sounds. (Although it isn't totally silent in operation) It
means electrical and CCD noise that can degrade the scanned image with
coloured speckles and banding.
This is one area where the Acer ScanWit has
me completely dumbfounded, as I can find hardly any noise at all!
Every other reviewer of every other scanner
has complained about the infamous dreaded green speckles in the shadows
to some degree. With the Acer, I really had to push the contrast and brightness
to ridiculously high levels to get any noise to show itself, and then the
noise that is detectable is fairly evenly distributed among the
three colour channels.
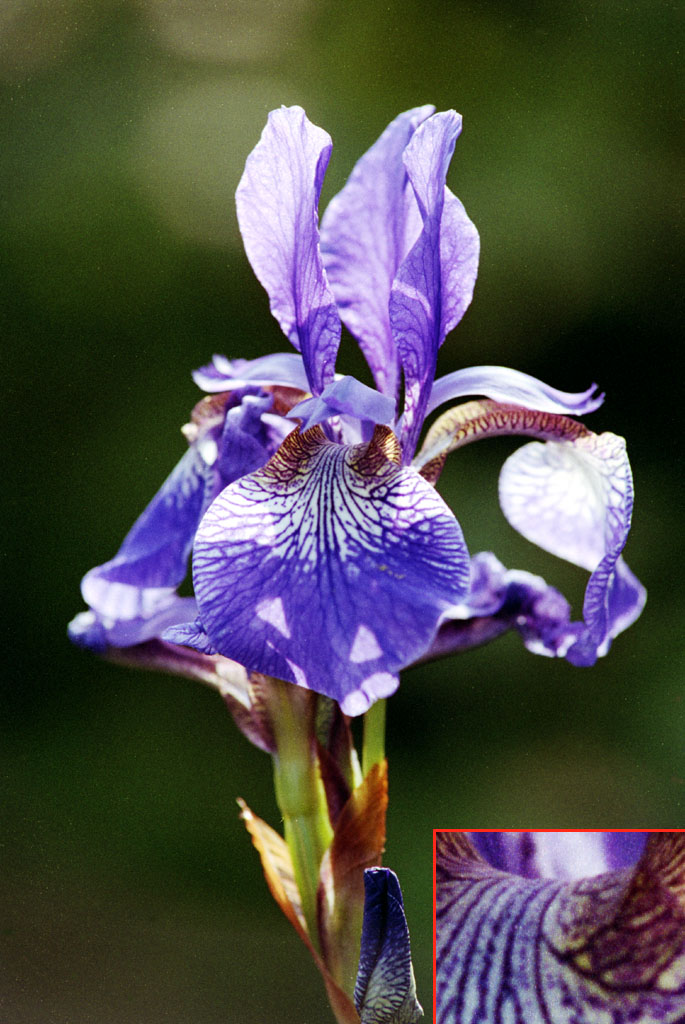
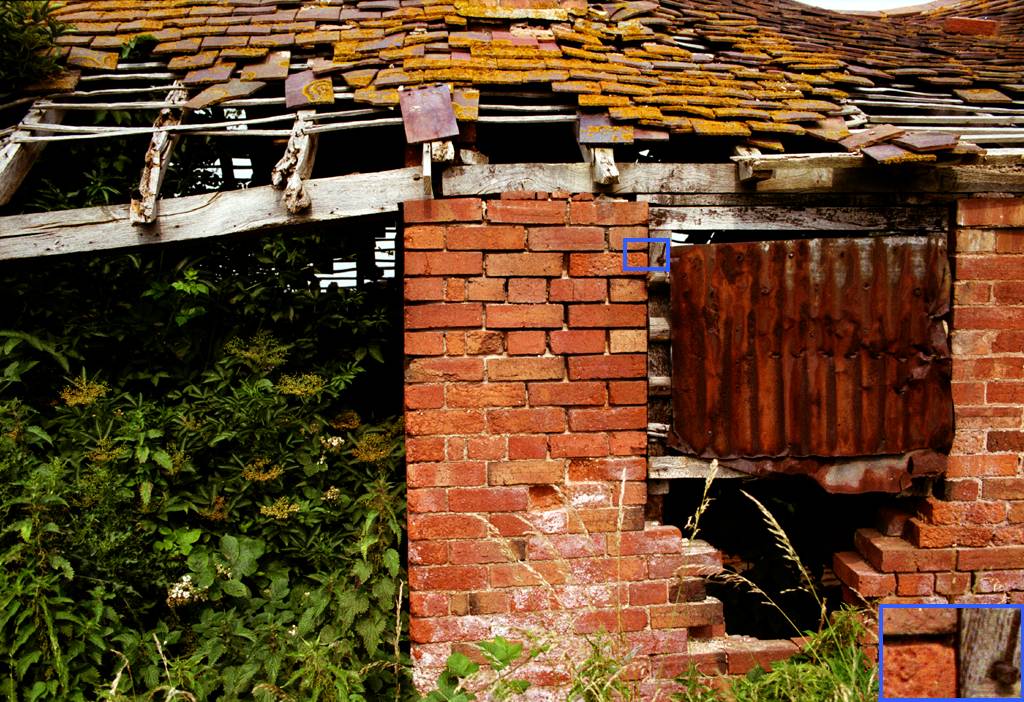
Since this review first went online, I've had
so many e-mails questioning this lack of noise that I'll attempt to prove
it with this illustration.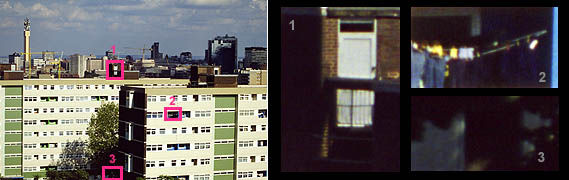
This is a scan from a Fujichrome slide with
very dense shadows. I've tried to match the contrast on screen with
the original slide as closely as possible. The sample areas are from the
visually densest parts of the slide, where detail is just visible
when the slide is viewed on a light box with a powerful loupe.
I think this serves to illustrate the dynamic
range quite well too. There is a bit more detail visible in the
original slide, in the shadowed brickwork of clip 1, and the shaded doorway
of clip 3 for instance, but it takes a strong light and a powerful magnifier
to see it.
Acer seem to have sacrificed a little of the
dynamic range to control noise, but at any rate, in normal circumstances
noise really isn't a problem.
Noise rating: ![]()
![]()
![]()
![]()
![]()
Flare:
"Flare" is another parameter that reviewers
of other scanners have found to be problematic. It shows itself as the
spreading of highlights into adjacent shadows, and has two contributing
factors. Genuine flare from the optical system of the scanner, and artefacts
from the CCD which can look like flare.
I used a very simple but severe test for flare
which consisted of scanning a very small pinhole of known size in a piece
of kitchen foil, measuring the scanned image, and looking at the way the
light spread out around the hole. The test revealed that optical flare
has been fairly well controlled, but that a slight CCD "memory" effect
is visible if the image contrast is boosted considerably. This is one area
where a small amount of criticism can be raised, but flare and CCD artefacts
aren't obtrusive enough to give any real concern.
Flare rating: ![]()
![]()
![]()
![]()
Dynamic range:
This is the ratio of the darkest to the brightest
tones in the film that can be distinguished by the scanner, and is fundamentally
a measure of how good the scanner is at recovering shadow detail from slides,
or separating overexposed highlights in a negative.
Acer, very sensibly, claim a modest (compared
to other makers) dynamic range of 3.2D, and this, realistically, is about
as good as you can get in a commercial desktop scanner.
I tested their claim by scanning a "stepwedge"
of neutral density filters ranging from completely clear up to a maximum
of 3.6D in 0.3D steps, plus an area of the frame rendered completely opaque
with black plastic tape.
The results I got threw me a little. I was
expecting not to be able to detect any difference between the opaque area
and the last couple of steps of the density wedge, but instead there was
a clear differentiation between even 3.6D and truly opaque. However, differentiation
between 3.3D and 3.6D was practically non-existent, so I guess I can fully
go along with Acer's assessment of 3.2D being the limit.
What this means in practice is that you can
get pretty much all of the shadow detail off a film like Ektachrome, which
has fairly weak blacks, but Kodachrome and Fuji Velvia will have shadow
detail that will remain (just) out of reach of the scanner.
Dynamic range rating: ![]()
![]()
![]()
![]()
![]()
Colour accuracy:
Colour accuracy is very difficult to quantify
without the backup of very expensive colorimetry and densitometry equipment
which I don't have, so I'm going to stick my neck out and give my subjective
assessment.
Overall colour accuracy is as good as I have
seen from some of the more expensive scanners available. Not the best I've
seen, but also a long way from the worst.
A lot of scanners favour red quite noticeably,
presumably because of the inherent sensitivity of CCD sensors to this end
of the spectrum, but the Scanwit doesn't. In fact it goes the other way,
and seems a bit weak on red, favouring green if anything. Perhaps Acer
have gone a bit over the top with Infra-red filtering - who knows?
Anyway, there's nothing so seriously wrong with the colour that
it can't be corrected fairly easily to match an original slide very closely.
Using Photoshop to apply a little extra red and yellow saturation, and
de-saturate green slightly is all that is needed in most cases. The settings
can easily be saved and applied to every scan where colour accuracy is
critical, but for normal pictorial use the difference is often not worth
bothering about.
Colour accuracy rating: ![]()
![]()
![]()
![]()
Full marks to Acer for their honesty. Where they've given hard and fast specifications the scanner has fully met them, and my star rating has taken this into account.
Conclusion:
To sum up: The hardware and image quality
of the Acer ScanWit are hard to fault, especially at the price. The acquisition
software is less than perfect, but there's nothing that can't be worked
around, and if it's any consolation, I've heard similar grumbles from owners
of other brands of scanner too. Documentation is the only area that
really lets down this otherwise excellent product, but then, at the price
I suppose corners have had to be cut somewhere, and better in this area
than in the hardware.
Overall though, this has to be one of the
better film scanners on the market, and certainly the best value. The competition
should start to worry, or at the very least lower their prices.
| Hardware quality | High quality of scanner let down by tacky slide and negative carriers. | |
| Software quality | A star deducted for MiraPhoto's eccentricities. | |
| Documentation | What can I say? | |
| Image quality | Up there with the best. | |
| Value for Money | Unbeatable! | |
| Overall rating | Highly recommended. |
Well, that concludes the review. I hope I've
covered just about everything, and been fair to both you, and Acer in the
process.
This page was completed at the end of May 2000, and since then quite a few things have happened. To avoid constantly updating this page I've created an additional Update Page, which you ought to check out.
For more information on scanners and scanning in general you should visit The Scantips Website where you'll find a wealth of tips, FAQs and useful links.
And in case you overlooked it in the text, here's my MiraPhoto user's guide again.
A big list of scanner links and other photography related topics can be found at Klaus Schroiff's Photozone
Another users opinions about the 2720s can be found at "Arb's" scanwit page.
More scanner comparisons, reviews and information can be found at Tony Sleep's website, the Imaging Resource website, and on Ed Hamrick's site.
And here's an excellent Q&A bulletin board covering digital imaging, and all aspects of digital and traditional photography.
My e-mail address for any feed-back is: Photoscientia@photoscientia.co.uk
Contact Acer Peripherals in America
Contact Acer Peripherals in Europe
Contact Acer scanner UK distributors: Introphoto Ltd.
There's now a 2720 user group e-mail forum that you can subscribe to at this address:
| Film Area | Scanning Mode | Resolution (dpi) | Time (seconds) |
| Full 35mm frame | high speed | 2700 | 41 |
| " | high quality 24 bit | 2700 | 36 |
| " | high quality 36 bit | 2700 | 67 |
| " | high speed | 1350 | 19 |
| " | high quality 24 bit | 1350 | 34 |
| " | high quality 36 bit | 1350 | 61 |
| N/A | Preview | Any | 11 |
| N/A | Auto-focussing | Any | 18 |
| Batch mode
4 x full-frame slides |
high quality 24 bit | 2700 | 172
focus time included |
| Resolution: | Optical 2700 x 2700 dpi |
| Scanning Modes: | Colour - 24 or 36 bit / Greyscale - 8 or 12 bit |
| Scanning Area: | 24mm by 35mm Max. |
| Batch scan ability: | Negative Filmstrip: Max.
batch scan 6 units
Positive Slide: Max. batch scan 4 units |
| Scanning Method: | One Pass |
| Scanning Module: | Tri-linear Colour CCD with 3-channel ASIC and 12 bit A/D converter |
| Scanning speed: | Less than 10ms per line - See Table |
| Interface: | SCSI II |
| Acoustic noise: | Under 45 dB |
| Power consumption: | 25 Watt maximum |
| Operating environment: | 10o to 40o Celsius and 10% to 90% RH |
| Platform: | IBM PC and Compatibles or PowerMac with OS8 |
| System Requirements: | Pentium CPU with 16MB RAM, CD-ROM drive, PCI slot |
| Operating System: | Win98/Win95/WinME/Win2K/WinNT 4.0 |
| Dimensions: | 162mm x 151mm x 347mm |
| Nett Weight: | 5.72 lbs. / 2.6 Kg |
| Bundled Software: | MiraPhoto driver, Adobe PhotoShop 5.0 LE, Ulead PhotoExpress |
| Accessories: | Mounted slide holder, 35mm filmstrip holder, PCI SCSI card |
| Acer Part Number: | 91.61624.01A |
|
|
Main text copyright P.L.Andrews, May
2000
Sample scans, pictures and some illustrations
copyright P.L.Andrews.
Text of specification table copyright Acer.
Acer logo and content of some other images
copyright Acer.
This page has been visited
times since July 22nd 2000
Last updated: 21st April, 2001.