
Rambling Intro: (skip
this bit if you're easily bored)
After doing a few dozen scans with my new film-scanner,
I began to notice that some were decidedly 'gritty'. Much more than they
should've been, judging by 10"x 8" photographic prints from the same negatives.
What was more confusing was that, sometimes, even
scans from adjacent frames gave different quality results, in terms of
smoothness of tone. The grittiness seemed to affect those exposures with
a low subject contrast much more than others, and was particularly noticeable
when low contrast subjects were combined with the use of fast film.
I'm not sure where I first heard about grain aliasing, or whether I kind of instinctively knew that that was the problem. Anyway, I thought there wasn't much that could be done about it, and put the problem to one side while I concentrated my attention on scanning only those images that I knew would scan well. At this point I should mention that I habitually use 100 ISO film, or slower, and the light has to be really bad, or the subject moving quite quickly, before I'll use anything faster. Excessive grain just isn't a problem with any 100 ISO film that's been made in recent years.
It wasn't until the Scanwit review was well under way, and I began
to get e-mail from users of fast film that I realised that grain, and grain
aliasing, was a real problem, and deserved a more thorough investigation.
I also had to face up to the fact that my own 'problem' negatives
would have to be scanned one day.
Slightly less rambling intro:
Writing this article makes me feel a bit like
Alice in Wonderland, having fallen into a rabbit hole, and not knowing
how I got here.
I thought that writing about grain aliasing
would be a simple matter.
It was going to be a brief introduction, blah,
blah, blah..., followed by a link to the definitive article on the web
about it.
Well, an entire morning spent doing a web search
revealed that the definitive article just doesn't exist (yet), and it looks
as if this is going to be the nearest thing to it. (Ohhh,
sh*t!)
The only places where I could find any hard
information about grain aliasing were a brief mention on Tony Sleep's excellent
site, here,
and a rather esoteric discourse on the relative merits of film and electronic
imaging, where you have to read between the lines, or rather the equations,
to get any idea about it.
(Esoteric
article for the terminally curious)
I also managed to track down a couple of printed articles about
CCD image sensor aliasing in general, but nothing specifically related
to film grain or scanning.
This complete lack of solid information about the subject of film grain aliasing started alarm bells ringing in my head, and I began to doubt that the phenomenon even existed. Hence the 'through the looking glass' feeling that I got when I attempted to research this article.
Anyway, having found a stony silence on the subject, I thought that it deserved a page of its own. So here it is.
I'm still not sure if I'm being brave, or stupid, but for what it's worth, here are my thoughts and findings on the subjects of grain, scanners, and aliasing between the two.
If you ever have occasion to use fast film and need to scan it, however,
then you'll almost certainly run into the problem; although you may not
realise what you've come up against.
For no apparent reason, your scanner will spew out the most appallingly
gritty, grainy, motley piece of junk that you've ever set eyes on.
You'll look at the negative or slide and say,
"OK, the original's a bit more grainy than I'd
like, but it's really not that bad."
And you'll try scanning it again.
The result might be a teeny bit better this time, or it might even
be worse, but it'll never be good.
Welcome to the twilight zone of grain aliasing.
My personal experience with the problem, together with e-mail I've received, and scans I've seen from other scanner users, has led me to the conclusion that grain aliasing is a very, very widespread problem, and one that most users don't even seem to know exists. In its least severe guise it's often taken for scanner noise, and at its worst it's shrugged off as "just my damned scanner playing up again", or "stupid grainy negative film, I'll stick to slides in future".
Well, ignoring problems is always one way of dealing with them, I
suppose; and there might even be a lurking attitude of :
"Who cares about film scanning problems anyway?
We'll all be using digital cameras in a few years time." Maybe we will,
but digitising the huge legacy of photographic images of the last 150 years
is going to keep us needing scanners for quite a while yet, and we ought
to try and get the best quality we can from those 'outdated' film images
with their annoying little grains.
What is
grain?
It's necessary to get a handle on grain before
we go any further, so bear with us if the following is all old news to
you.
Photographic film, whether slide, colour negative, or black&white, contains tiny crystals of Silver Halide salts, which are the light sensitive component. When the film is developed these crystals are turned into tiny filaments of metallic silver, and in a black and white negative the image is made up entirely of these microscopic threads. The threads curl up and clump together, and this is what is conventionally called 'grain'.
In a colour film, tiny blobs of dye are formed along with the silver during the development process. The silver is then chemically removed from the film, leaving only this dye image. It's these small specks of dye that are called grain in colour film, although, strictly speaking, they aren't grains at all.
The faster the film, the larger the clumps of silver formed and blobs of dye generated, and the more they tend to group together in random patterns and become more visible to the naked eye. It's this random patterning, rather than the actual size of the grains that can be visibly objectionable in photographic prints. The pseudo patterning is better known as 'granularity' and it's granularity, rather than the much smaller grain, that seems to cause aliasing, as I'll attempt to show later.
So, although film images appear to be continuous tone, they are actually made up of discrete little 'all or nothing' patches of dye or silver, and it's important to remember this fact.
For the sake of conciseness, I'll be using the term 'grain' to mean either silver or dye image specks from now on.
You've probably also heard beat frequencies, produced when two close, but not-quite-in-tune musical notes are played together. That's a form of aliasing.
Another common effect you'll probably be familiar with is Moiré patterning, seen when a piece of sheer cloth is folded over itself, or when trying to copy a halftone reproduction on a flatbed scanner.
Aliasing in CCD image sensors is a fairly well documented phenomenon, and is a cause of major concern to, and investigation by, CCD manufacturers. (Kodak is a major player in this field, and is vigorously researching the subject). However, most effort seems to be going toward addressing the problem in full-frame sensors, such as are used in digital cameras, because aliasing is one of the hurdles that will have to be overcome if electronic sensors are ever going to exceed the resolution and quality that film is capable of. (some people think we're already there. Hmmm.)
As hinted at in the section on grain, film can also be thought of
as a digital medium.
The grains of silver halide are either developed, or they're not;
there's no in between, and the same goes for the dye specks in colour film.
The one big difference between film and electronic image sensors is that
the size of film grains is variable, as is the spacing between them, but
essentially, film is an array of chemical pixels arranged in a random order.
I think it's important to think of film in this way, as it enables
you to grasp the concept of two digital systems interacting with each other.
It's also important to realise that it's only the random arrangement of
grain that prevents aliasing patterns being exhibited by film itself.
The science behind it all:
Skip this next bit
if mathematical formulae and technical talk scare or bore you.
Here's an article which echoes a lot of what I've just said about aliasing, but in realtionship to High Definition TV
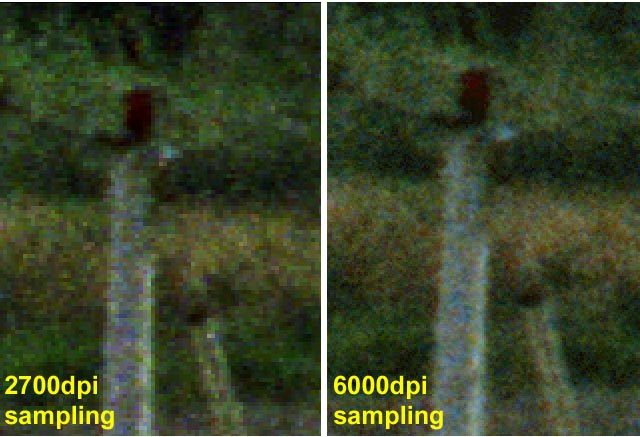
Real life examples
Coming back down to earth from these high-flown theoretical considerations,
let's look at some real film, and real scans.
Case study number one:
Here are two scans taken from about one quarter
of the area of a 35 mm frame.
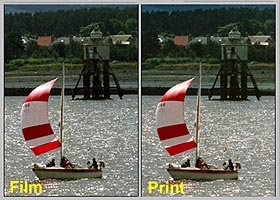
You might have thought that the scan direct from film would win hands
down as far as quality goes, and, sure enough, the tonal range and colour
saturation of the film scan had to be deliberately worsened to bring it
down to the level of the flatbed scan.
But it's a different story when we take a look at the grain detail
in the two scans.
I think this shows that aliasing may be present, even when a scan
is of acceptable quality.
It also looks like a pretty good argument for having film scanners
with very high resolutions. There may be nothing to be gained in the way
of usable image detail from the film, but the overall impression of quality
and image 'roundness' is definitely improved.
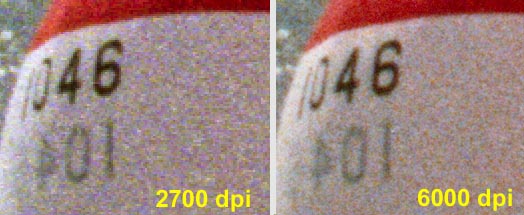
Doesn't this mean that aliasing is just
a function of resolution?
In a word. NO.
Interpolating the 2700dpi scan to 6000dpi just gives us a greater
number of bad pixels, and re-sampling the 6000dpi scan down to 2700 still
results in a better image than the native 2700dpi scan.
Aliasing is a hardware problem that really needs a hardware
solution, although software may be able to undo some of its effects.
Another pair of detail sections taken from the above scans re-inforce
the argument.
I think they also show rather well why aliasing is often confused
with, or mistaken for, CCD noise.
Believe me when I tell you that almost none of the speckling in
this example is actually due to noise; if you compare the two images carefully,
you can see that the obtrusive lighter and darker pixels in the left-hand
image align with small brightness variations in the grain pattern of the
image on the right.
(This apparent amplification of contrast is most likely the result
of phase transformation, as proposed above.)
The file is quite big, so I'll leave you to choose whether you want
to view it or not: Mast detail (62.5Kb)
Case study number two:
Here are two examples of clear sky tone scanned from 100 ISO and
200 ISO film respectively.
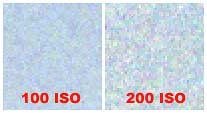
Examination of the grain structure of the negatives under a microscope
doesn't show an awful lot of difference in the size of the individual specks
of dye, apart from in the cyan layer, where the slower film shows a lot
less dye spreading and clumping. What does show up is the fact that
the dye speckles of the 200 ISO film tend to form slightly larger clusters
which join up into chain-like patterns, especially in the magenta layer.
The 100 ISO material has a more thoroughly random texture to it,
or so it appears to me.
Also, in the denser parts of the image, the 200 ISO film maintains
a visible grain texture throughout, whereas the 100 ISO film gets a smoother
appearance, with the dye becoming almost continuous in the darkest areas.
Measurement through the microscope revealed that the dye speckles
in the magenta layer were less than 3 microns in diameter for both films,
but the average cluster consisted of 3 to 4 individual speckles in the
100 ISO emulsion, and 4 to 5 in the 200. This resulted in a cluster size
of about 6 microns and 9 microns respectively.
As a side effect of the larger 200 ISO clusters, the distance between
them was reduced, and the clusters themselves tended to touch and join
up. This didn't happen to the smaller clumps of dye in the 100 ISO film.
In spite of all these measurements, and detailed differences, there's still absolutely nothing that stands out in the 200 ISO film as being the definite cause of its poor scanning properties.
( In case you're wondering. The 200 ISO film is the worst I've come across so far for granularity and aliasing at this ISO rating. Scans from it are consistently awful. Without naming names; it's sold by a major photographic retail chain in the UK as their own brand film. There's no clue to its real origin on the film margin. All I can say is, just avoid cheap film!)
Addendum: After further study
into the character of film grain, it appears that the very same mechanism
that gives rise to visual graininess, i.e. the clumping together of individual
grains or dye specks, is the main cause of aliasing and grain artefacts
in scanning.
What appears to happen, is that once the grain clumps reach
a critical size (approaching pixel size) aliasing is unavoidable, and
this effectively amplifies the grain, making it much more visually obvious
and objectionable.
This effect almost certainly takes place at different rates in the Cyan,
Yellow, and Magenta layers of the film, giving rise to the familiar colour mottling.
See also: Kodak's explanation of the difference between
granularity and graininess, and the way that grain and dye images give rise to
visual graininess.
Ok. I admit that all the evidence I've presented so far is all hypothetical, circumstantial, or empirical, and probably wouldn't stand up in a court of law. (especially if Ally McBeal was defending, and gave one of those tear-jerking summing up speeches direct to camera, about the value of friendship, and humanity, and cute little puppies...., but I digress.)
Nevertheless, something must be responsible for all those unexpectedly poor scans that so many people have been getting, and if not grain aliasing, then what? I think the sum of the evidence speaks for itself.
So, until someone comes up with a better idea, I declare the case
for the existence and guilt of grain aliasing proven.
A complete answer would probably involve a
deep understanding of fourier transforms, probability theory, statistical
analysis, population distributions, organic and inorganic chemistry, with
a smattering of chaos theory thrown in for good measure.
If I did understand all that, I'd be winning
the lottery every other week or playing the stock market, not wasting my
time doing this poxy web page.
Anyway, explaining the mechanism whereby a problem occurs still doesn't get us a real feel for it, and dealing in abstracts isn't the same as seeing something really happen.
I scratched my head for ages, trying to think
up a way of illustrating how aliasing takes place during the process of
scanning.
The problem is: Any digitised illustration
of film grain is automatically aliased as it's scanned, so it's almost
impossible to show genuine before and after pictures of real film grain
on the web.
I thought of using microscope images, but as I mentioned previously, they're not very informative, and certainly not easy to relate to real scans.
Then I noticed how similar the 'add noise'
filter in Photoshop is to the appearance of real film grain.
BINGO! That was the answer.
I could simulate all the stages of
the aliasing process using Photoshop.
So here, for the first time on your screens,
before your very eyes, [Dramatic drum roll........]
a demonstration of grain aliasing in action!
[........tada!]


[ Maybe not the surround-sound cyclorama 3D technicolor experience you
were expecting huh?] I'll explain.
On the left is the simulated film grain, before
scanning.
Centre is a representation of the tri-linear
sensor grid of the scanner CCD.
Finally, on the right is the aliased film
grain. (This is the result of combining the film grain image and the CCD
sensor grid image in a way that simulates the pixelisation process.)
They're all represented at a magnified scale,
of course, but if we say that the original grain (left) is barely acceptable,
then you can easily see that the aliased result (right) is totally unacceptable.
To me, the image on the right looks darned
close to the sort of mottled mush that I sometimes see in genuine scans
from faster films.
Strange but true
It seems incredible that any combination of
the left and centre images could produce the image on the right, but that's
what happens, and that's what I believe is happening to the real film grain
when it's scanned.
I could hardly believe it myself, when I first
tried the experiment.
Sceptical? Then try it for yourself:
Download the GIF images of the simulated grain
and pixel grid, and open them in Photoshop. Convert them to RGB using the
mode menu, and merge one image with the other, using the 'apply image'
command.
The settings to use are exclusion blending,
with an opacity of 100%.
Sorry, but you'll need the full version of Photoshop for this. LE doesn't support the 'apply image' feature. Apologies also for using bulky GIF files, but JPEG compression loses too much detail for this demo to work properly.
Playing with models
Messing about with the above images throws up all sorts of crazy
effects.
For instance, if you apply the original 'grain' image onto the aliased
result, the pixel grid appears out of it, and if you apply the pixel grid
a second time onto the aliased image, the original grain comes back.
This opens up all sorts of intriguing possibilities, including being
able to apply a matrix of some sort over a real live aliased scan, and
recover the original, de-aliased image from it.
Unfortunately, I think we're a fair way from doing that at the moment.
Still, you never know.
The above method of modelling grain aliasing
is quite crude, and there are a lot of factors that aren't taken into account.
However, I'd rather think of it as quick'n'dirty, because having any sort
of visual model for the process is better than nothing, and can help us
to find methods of reducing the effects of aliasing.
This leads us quite neatly into the next section.
The one sure way to circumvent grain aliasing problems, is not to use film that provokes those problems in the first place. ( I know this is a glib answer, but it's also the easiest way around the problem.)
Using film of reputable manufacture and modest
ISO speed will minimise any risk of aliasing.
Kodak is one maker that seems to take the
problem of aliasing seriously, and in fact they list suitability for scanning
in the specifications of some of their films.
Konica's negative film also has a good reputation for 'scannability', and I can personally vouch for its excellent scanning qualities.
Let's assume that we haven't got the luxury
of picking and choosing which type of film we have to scan.
What then?
Well, the best option is to deal with aliasing
at
the scanning stage, because that's when it actually happens.
Measures that can be taken during the scanning
process.
One common suggestion for reducing aliasing
is to try a different scan resolution.
Sorry, this just doesn't work, it may even
exaggerate the effect.
Aliasing takes place at the hardware level
in the scanner, and as you'll see from the technical
discussion reducing the number of samples taken will
generally make matters worse, while interpolating to a higher resolution
doesn't have any effect on the hardware.
There is one ray of hope, and that is to throw the scan slightly
out of focus at the scanning stage.
Putting an image slightly out of focus has the effect of blurring
very fine detail, such as film grain, far more than gross detail.
If your scanner is capable of manual focus, then of course this is an easy thing to do, and it's simply a matter of experimenting with the focus setting to minimise the aliasing effect without destroying too much larger detail.
If, like my Acer Scanwit, your scanner doesn't have the luxury of allowing you to override the autofocus, then there might still be something you can do..... Like tricking the scanner into deliberately bad focus.
Take one slide, or negative, and reverse it in the carrier. Do your preview scan on this, and the autofocus will set itself on the wrong side of the film for the rest of the scans.
This may still not be enough defocusing, and some further improvisation
will be necessary.
Another piece of clear film sandwiched behind the frame that you're
using for focussing, might shift the plane of focus enough perhaps, or
a slightly thicker piece of transparent plastic taped over the front of
it. ( a sneaky option this last one, since we're using the refraction of
the plastic to effectively move the film plane towards the lens.)
It all depends on your scanner, and the degree of defocusing you
find necessary.
After a little experimentation, I've also concluded that the direction
in which the lens is defocused makes a marked difference to the amount
of grain reduction for a given image softening as well.
For the Scanwit, the lens should be focused slightly more distant
than the real film plane for optimum effect.
Ed Hamrick's Vuescan
software gives the capability to manually override the autofocus function
on most scanners, and this gives excellent control over the amount of image
softening that you can apply.
Different degrees of defocus are desirable to reduce the aliasing
effect for any particular film and scanner combination, without too much
loss of overall definition.
Someone mentioned anti-newton slide glasses to me the other day,
and these may provide an alternative answer.
The slightly dimpled surface could give just the amount of diffusion
that we're after. (I must admit, I still haven't tried this one yet.)
Anyway, you get the idea. Experiment, it's fun!
Well, it looks as if someone else has taken the subject of aliasing and grain artefacts seriously. (at last!)
Applied Science Fiction; the company that invented digital ICE (tm) technology have introduced an in-scanner system to reduce grain.
They are calling this system GEM (Grain Equalization & Management).
How it works is a trade secret at the moment, but then digital ICE
was a secret technology when it was introduced.
It probably won't be long before this technique is in the public
domain.
My guess is that it involves looking at the pixel to pixel contrast,
while varying the focus of the scanner, and then applying a smoothing algorithm
based on the change in contrast detected at the higher spatial frequencies.
So much for attempts to stop aliasing
at source.
Now let's see if there are any simple steps
that can be taken 'after the fact', as it were.
Software solutions:
Short of the imaginary 'magic matrix' filter that I invented a few
paragraphs ago, what else can be done?
There is only so much that can be done with a scan that already exhibits aliasing, and in most cases 'improvement' means a trade off between smoothness of tone, and sharpness.
Use of averaging, blurring ,despeckle and
other filters.
The least destructive of the generic blurring
tools available in Photoshop is probably the despeckle filter. Sharpness
is generally preserved, but an artificial looking edge is often given to
detail in the image, use with caution.
Blurring gives a more natural looking image, but the aliasing artefacts aren't obscured sufficiently unless image detail is sacrificed too. Gaussian blurring, followed by sharpening with the unsharp mask filter may give satisfactory results.
If the grain is only noticeable in areas of the image where there is no fine detail, then averaging (median) can be very effective. A large area of sky, for instance, can be selected, and the averaging filter applied to just that area. Too much detail is lost for overall use, however.
It's sometimes advantageous to use these techniques on only the most affected colour channel of the image. (usually the blue)
There are quite a few other permutations of filter that can effect some improvement in an image which shows aliasing artefacts, but once an image has been scanned the damage is done, and there's no way to completely undo it.
A company called Idahoairships
have a great tutorial on using Photoshop filters to reduce all kinds of
nasty image artefacts.
And there are more links along similar lines Here,
Here,
and Here
Have I made a believer out of
you yet?
In the few weeks since I published this, there
seems to have been a great surge of interest in the subject, and it's as
if some sort of taboo has been broken.
I now feel completely vindicated in publishing
this little report.
I'd like to think that I've played a small part in the 'public awareness campaign' for grain aliasing, and if you want to discuss or contribute to the subject in any way; then I can be reached at this e-mail address:
|
|
|
|
|
|
All text and images are Copyright P.L.Andrews,
August 2000;
Any Innovative ideas proposed in this treatise
are the intellectual property of P.L.Andrews.
This dated and published document may be used
to challenge any future Patent applications.
September 1st 2000.